Wednesday, 23 March 2011

Export GridView to Excel

It is essential for end user to save the reports in a document which is portable.

The following steps are required to export gridview to microsoft excel

Step1: Override the method "VerifyRenderingInServerForm" in our code otherwise we will get an Error Control of type "GridView" must be placed inside of the form tag with runat="server". Even we are placing a gridview in form which is running at server becausing we are calling the method RendorControl() manualy. Syntax to override the method is as follow
public override void VerifyRenderingInServerForm(Control control)
{
//Confirms that an HtmlForm control is rendered for the 
//specified ASP.NET
//server control at run time.
}

Step2:Assign datasource to gridview and set the allowpaging and allowsorting properties to false.

Ex:
public void ReportToExcel(GridView gridView,String fileName)
{
gridView.AllowPaging = false;
gridView.AllowSorting = false;
gridView.DataSource = resultDataSet;
gridView.DataBind();
if (gridView != null && gridView.Rows.Count > 0)
{
PrepareGridViewForExport(gridView);
ExportGridView(fileName,gridView);
}
}

Step3: Prepare the gridview to export. This step is requied only if the control otherthan literal used in the gridview.(Ex: if we use EditTemplate)

Sample code to Prepare Gridview For Export is as follows
public static void PrepareGridViewForExport(Control gvcontrol)
{
for (int i = 0; i < gvcontrol.Controls.Count; i++)
{
Control current = gvcontrol.Controls[i];
if (current is LinkButton)
{
gvcontrol.Controls.Remove(current);
gvcontrol.Controls.AddAt(i,
 new LiteralControl((current as LinkButton).Text));
}
else if (current is ImageButton)
{
gvcontrol.Controls.Remove(current);
gvcontrol.Controls.AddAt(i,
 new LiteralControl((current as ImageButton).
AlternateText));
}
else if (current is Image)
{
gvcontrol.Controls.Remove(current);
gvcontrol.Controls.AddAt(i
, new LiteralControl((current as Image).
AlternateText));
}
else if (current is HyperLink)
{
gvcontrol.Controls.Remove(current);
gvcontrol.Controls.AddAt(i,
 new LiteralControl((current as HyperLink).Text));
}
else if (current is DropDownList)
{
gvcontrol.Controls.Remove(current);
gvcontrol.Controls.AddAt(i,
new LiteralControl((current as DropDownList).
SelectedItem.Text));
}
else if (current is CheckBox)
{
gvcontrol.Controls.Remove(current);
gvcontrol.Controls.AddAt(i,
new LiteralControl((current as CheckBox).Checked 
? "True": "False"));
}
else if (current is TextBox)
{
gvcontrol.Controls.Remove(current);
gvcontrol.Controls.AddAt(i,
new LiteralControl((current as TextBox).Text));
}
else if (current is HiddenField)
{
gvcontrol.Controls.Remove(current);
}
if (current.HasControls())
{
PrepareGridViewForExport(current);
}
}

Step4: Export Grid view to Excel By using HtmlTextWriter. There is one method in gridview i.e, RenderControl(Writer)
public static void ExportGridView(string fileName, GridView gv)
{

HttpContext.Current.Response.ClearContent();
HttpContext.Current.Response.
AddHeader("content-disposition",
string.Format("attachment; filename={0}", fileName));
HttpContext.Current.Response.ContentType =
 "application/ms-excel";
StringWriter sw = new StringWriter();
HtmlTextWriter htw = new HtmlTextWriter(sw);
gv.RenderControl(htw);
HttpContext.Current.Response.Write(sw.ToString());
HttpContext.Current.Response.End();
}

Query to count total number of stored procedures,tables and Views in database

When you want to count the total number of stored procedures in your database

the solution is

select count(*) as 'total' from sysobjects where xtype='P'

Note: where xtype='p' for stored procedures

xtype='V' for views

xtype='U' for tables

Tuesday, 22 March 2011

HOW TO: Control Authorization Permissions in an ASP.NET Application

Configure Access to a Specific File and Folder


  1. Set up forms-based authentication.For additional information, click the article numbers below to view the articles in the Microsoft Knowledge Base:

  2. Request any page in your application to be redirected to Logon.aspx automatically.
  3. In the Web.config file, type or paste the following code.This code grants all users access to the Default1.aspx page and the Subdir1 folder.
    <configuration>
    <system.web>
    <authentication mode="Forms" >
    <forms loginUrl="login.aspx" name=".ASPNETAUTH"
    protection="None" path="/" timeout="20" >
    </forms>
    </authentication>
    <!-- This section denies access to all files in this application
     except for those that you have not explicitly specified by using
    another setting. -->
    <authorization>
    <deny users="?" />
    </authorization>
    </system.web>
    <!-- This section gives the unauthenticated user access to
    the Default1.aspx page only. It is located in the same folder
    as this configuration file. -->
    <location path="default1.aspx">
    <system.web>
    <authorization>
    <allow users ="*" />
    </authorization>
    </system.web>
    </location>
    <!-- This section gives the unauthenticated user access
    to all of the files that are stored in the Subdir1 folder.  -->
    <location path="subdir1">
    <system.web>
    <authorization>
    <allow users ="*" />
    </authorization>
    </system.web>
    </location>
    </configuration>

    Users can open the Default1.aspx file or any other file saved in the Subdir1 folder in your application. They will not be redirected automatically to the Logon.aspx file for authentication.
  4. Repeat Step 3 to identify any other pages or folders for which you want to permit access by unauthenticated users.

How To Implement Forms-Based Authentication in Your ASP.NET Applicationby Using C#.NET

Authentication and authorization are important to our web application.

Configure the Security Settings in the Web.config File


This section demonstrates how to add and modify the <authentication> and <authorization> configuration sections to configure the ASP.NET application to use forms-based authentication.
  1. In Solution Explorer, open the Web.config file.
  2. Change the authentication mode to Forms.
  3. Insert the <Forms> tag, and fill the appropriate attributes. (For more information about these attributes, refer to the MSDN documentation or the QuickStart documentation that is listed in the REFERENCES section.) Copy the following code, and then click Paste as HTML on the Edit menu to paste the code in the <authentication> section of the file:


    <authentication mode="Forms">
    <forms name=".ASPXFORMSDEMO" loginUrl="logon.aspx"
    protection="All" path="/" timeout="30" >
    
    <credentials passwordFormat="Clear">
    <user name="ramp" password="password"/>
    </credentials>
    </forms>  
    
    </authentication>


  4. Deny access to the anonymous user in the <authorization> section as follows:


    <authorization>
    <deny users ="?" />
    <allow users = "*" />
    </authorization>


For more details refer this article

Export GridView to Pdf

Steps to export gridview to pdf:
  1. Download the Itextsharp.dll
  2. Add ItextSharp.dll reference to your project.
  3. the following is the sample code for export gridview to pdf
protected void ExportToPDF(GridView gvReport, bool LandScape)
{
int noOfColumns = 0, noOfRows = 0;
DataTable tbl = null; 

if (gvReport.AutoGenerateColumns)
{
// Gets the DataSource of the GridView Control.
tbl = gvReport.DataSource as DataTable;
noOfColumns = tbl.Columns.Count;
noOfRows = tbl.Rows.Count;
}
else
{
noOfColumns = gvReport.Columns.Count;
noOfRows = gvReport.Rows.Count;
}

float HeaderTextSize = 8;
float ReportNameSize = 10;
float ReportTextSize = 8;
float ApplicationNameSize = 7;

// Creates a PDF document

Document document = null;
if (LandScape == true)
{
// Sets the document to A4 size and rotates it so that the
//   orientation of the page is Landscape.
document = new Document(PageSize.A4.Rotate(), 0, 0, 15, 5);
}
else
{
document = new Document(PageSize.A4, 0, 0, 15, 5);
}

// Creates a PdfPTable with column count of the table equal to
// no of columns of the gridview or gridview datasource.
iTextSharp.text.pdf.PdfPTable mainTable = new iTextSharp.text.pdf.PdfPTable(noOfColumns);

// Sets the first 4 rows of the table as the header
// rows which will be repeated in all the pages.
mainTable.HeaderRows = 4;

// Creates a PdfPTable with 2 columns to hold the header in the exported PDF.
iTextSharp.text.pdf.PdfPTable headerTable = new   iTextSharp.text.pdf.PdfPTable(2);

// Creates a phrase to hold the application name at the left hand side of the header.
Phrase phApplicationName = new Phrase("Sample Application", FontFactory.GetFont("Arial", ApplicationNameSize, iTextSharp.text.Font.NORMAL));

// Creates a PdfPCell which accepts a phrase as a parameter.
PdfPCell clApplicationName = new PdfPCell(phApplicationName);
// Sets the border of the cell to zero.
clApplicationName.Border = PdfPCell.NO_BORDER;
// Sets the Horizontal Alignment of the PdfPCell to left.
clApplicationName.HorizontalAlignment = Element.ALIGN_LEFT;

// Creates a phrase to show the current date at the right hand side of the header.
Phrase phDate = new Phrase(DateTime.Now.Date.ToString("dd/MM/yyyy"),
FontFactory.GetFont("Arial", ApplicationNameSize, iTextSharp.text.Font.NORMAL));

// Creates a PdfPCell which accepts the date phrase as a parameter.
PdfPCell clDate = new PdfPCell(phDate);
// Sets the Horizontal Alignment of the PdfPCell to right.
clDate.HorizontalAlignment = Element.ALIGN_RIGHT;
// Sets the border of the cell to zero.
clDate.Border = PdfPCell.NO_BORDER;

// Adds the cell which holds the application name to the headerTable.
headerTable.AddCell(clApplicationName);
// Adds the cell which holds the date to the headerTable.
headerTable.AddCell(clDate);
// Sets the border of the headerTable to zero.
headerTable.DefaultCell.Border = PdfPCell.NO_BORDER;

// Creates a PdfPCell that accepts the headerTable as
// a parameter and then adds that cell to the main PdfPTable.
PdfPCell cellHeader = new PdfPCell(headerTable);
cellHeader.Border = PdfPCell.NO_BORDER;
// Sets the column span of the header cell to noOfColumns.
cellHeader.Colspan = noOfColumns;
// Adds the above header cell to the table.
mainTable.AddCell(cellHeader);

// Creates a phrase which holds the file name.
Phrase phHeader = new Phrase("Sample Export",
FontFactory.GetFont("Arial", ReportNameSize, iTextSharp.text.Font.BOLD));
PdfPCell clHeader = new PdfPCell(phHeader);
clHeader.Colspan = noOfColumns;
clHeader.Border = PdfPCell.NO_BORDER;
clHeader.HorizontalAlignment = Element.ALIGN_CENTER;
mainTable.AddCell(clHeader);

// Creates a phrase for a new line.
Phrase phSpace = new Phrase("\n");
PdfPCell clSpace = new PdfPCell(phSpace);
clSpace.Border = PdfPCell.NO_BORDER;
clSpace.Colspan = noOfColumns;
mainTable.AddCell(clSpace);

// Sets the gridview column names as table headers.
for (int i = 0; i < noOfColumns; i++)
{
Phrase ph = null;

if (gvReport.AutoGenerateColumns)
{
ph = new Phrase(tbl.Columns[i].ColumnName,
FontFactory.GetFont("Arial", HeaderTextSize, iTextSharp.text.Font.BOLD));
}
else
{
ph = new Phrase(gvReport.Columns[i].HeaderText,
FontFactory.GetFont("Arial", HeaderTextSize, iTextSharp.text.Font.BOLD));
}

mainTable.AddCell(ph);
}

// Reads the gridview rows and adds them to the mainTable
for (int rowNo = 0; rowNo < noOfRows; rowNo++)
{
for (int columnNo = 0; columnNo < noOfColumns; columnNo++)
{
if (gvReport.AutoGenerateColumns)
{
string s = gvReport.Rows[rowNo].Cells[columnNo].Text.Trim();
Phrase ph = new Phrase(s, FontFactory.GetFont("Arial", ReportTextSize, iTextSharp.text.Font.NORMAL));
mainTable.AddCell(ph);
}
else
{
if (gvReport.Columns[columnNo] is TemplateField)
{
DataBoundLiteralControl lc = gvReport.Rows[rowNo].Cells[columnNo].Controls[0] as DataBoundLiteralControl;
string s = lc.Text.Trim();
Phrase ph = new Phrase(s, FontFactory.GetFont("Arial", ReportTextSize, iTextSharp.text.Font.NORMAL));
mainTable.AddCell(ph);
}
else
{
string s = gvReport.Rows[rowNo].Cells[columnNo].Text.Trim();
Phrase ph = new Phrase(s, FontFactory.GetFont("Arial", ReportTextSize, iTextSharp.text.Font.NORMAL));
mainTable.AddCell(ph);
}
}
}

// Tells the mainTable to complete the row even if any cell is left incomplete.
mainTable.CompleteRow();
}

// Gets the instance of the document created and writes it to
// the output stream of the Response object.
PdfWriter.GetInstance(document, Response.OutputStream);

// Creates a footer for the PDF document.
HeaderFooter pdfFooter = new HeaderFooter(new Phrase(), true);
pdfFooter.Alignment = Element.ALIGN_CENTER;
pdfFooter.Border = iTextSharp.text.Rectangle.NO_BORDER;

// Sets the document footer to pdfFooter.
document.Footer = pdfFooter;
// Opens the document.
document.Open();
// Adds the mainTable to the document.
document.Add(mainTable);
// Closes the document.
document.Close();

Response.ContentType = "application/pdf";
Response.AddHeader("content-disposition", "attachment; filename= SampleExport.pdf");
Response.End();
}

How to Generate the Scripts for Table with data in sql server 2011

Steps requied to generate Script in MS-Sql Server 2011:

  1. Click on database. Right click on database and open context menu.Select Tasks > Generate Scripts... from displayed menu.

  2. Microsoft SQL Server 2011 Generate and Publish Scripts wizard is displayed. Click on Next buton.

  3. We are going to choose database objects that we want to create scripts for. If you want to script data of a single sql table, choose the "Select specific database objects" option. If you want to generate script for all database objects in the target database you can choose "Script entire database and all database objects". Click on Next button

  4. Next we will configure scripts in detail and save or publish options.If you want to display the generated data script in the SQL Server Management Studio Query Editor window.

  5. The most important configuration here in this screen is configuring the script wizard to script data. So please click Advanced buton. In the Advanced Scripting Options configuration screen, find Types of data to script parameter. The default selection is Schema only script type. In order to script data in table in SQL Server, you can either choose Data only script type or Schema and data script type.

  6. After you completed your advanced scripting options selection, click OK buton. Then click Next buton. Click Next buton if everything is correct. Or click Previous buton to reconfigure generate script data options.

  7. The Generate and Publish Scripts wizard, executes the task and displays each step and the result of the task execution.

  8. Click Finish buton to close the SQL Server 2011 generate script wizard.

How to Generate the Scripts for Table with data in sql server 2008

MS SQL Server 2008 has new Generate Scripts option which enables sql programmers
to script data in SQL Server database tables. SQL developers can script data
from sql tables into a script file, to the clipboard or script data on a new sql
query window. Script data can be used to export and/or import table data from
one database to another database.

The Script Data option creates INSERT
statements foreach row in the table using the column data that the related table
record has. Later than the scripted table data can be used by executing the
generated t-sql scripts, to create a copy of the original table on an other
server or an other database with identical data or identical rows on the
destination database or table.

SQL Server generate script with data is a powerful SQL Server tool in order to
create sql script to move data from one database to another database.

Script Data option is new with Microsoft SQL Server 2008. So on the Tasks
context menu of a database although the Generate Scripts... option exists, we
won't be able to find the Script Data options in the Choose Script Options
screen of the Script Wizard.

In this article, I want to demonstrate with a sample how a sql developer can use
the Generate Scripts task in order to script table data of a SQL Server 2008
database table.

Open the Generate Scripts SubMenu Item from Task Menu


First of all, open the Microsoft SQL Server Management Studio which is installed
from the Client Tools of a MS SQL Server 2008 installation package.

Connect to a MS SQL Server 2008 database instance using the Server Explorer or using the
Connect screen.

Then open the Object Explorer window and expand the Databases
node.

Here I connected to the local SQL Server 2008 instance and clicked over
the Databases node and a list of existing sql server databases are visible in
the object explorer window now. Later, I clicked the sql database MyWorks which
owns the tables that I want to script data, rows/records of the database.

Continue by right clicking on the database name and open the context menu,
chooes Tasks menu and open submenu. Select Generate Script submenu item from the
displated list.


Tasks menu - Generate Scripts...

Generate SQL Server Script Wizards


When you select the Generate Scripts sub menu item the Generate SQL Server
Scripts Wizard starts. SQL administrators and sql programmers can use the Script
Wizard to generate t-sql scripts as a t-sql scripter to create scripts for any
object (tables, views, schemas, etc). You can work in detail on the Script
Wizard and find useful hint that you can benefit in your sql developments.


Generate SQL Server Scripts Wizard

Select Database to Script


The first step in the Script Wizard is detemining the database to work on. You
can choose a sql database among the listed all sql databases existing on the sql
server instance.


Script Wizard - Select Database Option

Choose Script Options


Here is the screen where sql developers can configure the script details, and
where developers can shape the automatic generated script according to the
applications needs and requirements.

For our case, since we want to script table data which exists in the database
that I have selected in the previous steps, we should set the Script Data option
to True. You can see that the Script Data option is listed in the Table/View
Options sections on the Choose Script Options screen. Since default Script Data
option is set to false by default, we should alter this option in order to get
an Insert statement for each row in the database table.

Note : Set Script Data option to True


Script Wizard - Choose Script Options

Choose Object Types


This option in the Script Wizard is for the types of the objects we want the
script generator to build scripts for. Since we deal with database tables, we
will select Tables among the listed options such as Schema and User-defined
table types.


Script Wizard - Choose Object Types

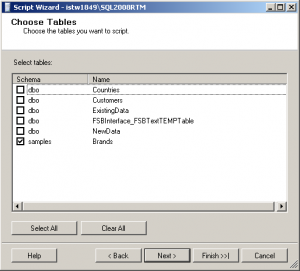
Choose Tables


Since we selected Tables in the previous step, the wizard now displays all the
tables that exists in the selected sql database. Here as a developer, I make a
list of tables that I want to generate table data scripts for. For our sample
case, I only select one table.


Script Wizard - Choose Tables

Output Option


Output Option screen in the Generate Script Wizard is the screen where a sql
administrator or a programmer can make a selection among the existing output
options. The script generator can create the desired scripts in the forms of a
file, also can split the automatic generated script per object basis, or define
the file as a unicode file or in ANSI text. A database developer can also select
the file name and the output file folder for the script engine to create and
place the script file.

Other output options are script to clipboard, just like a Copy-Paste operation
and the last option is displaying the generated script on a new query window in
the Microsoft SQL Server Management Studio.

I selected the New Query Window option in order to display the generated script
by the MS SQL Server 2008.


Script Wizard - Output Options

Script Wizard Summary


Here is the last stop before proceeding to the script generation where database
programmers can see which options they have selected and can go back to previous
screen and make re-selections in the options for a desired script.


Script Wizard Summary

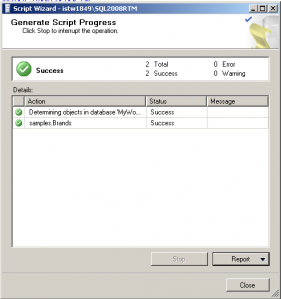
Generate Script Progress


Generate Script Progress screen displays the status of the scripting operation.
If an error occurs sql developers and administrators can find the error details
on this screen. If everything runs without any error and does not fail, you will
see Success status for each scripting action on the progress screen.


Generate Script Progress

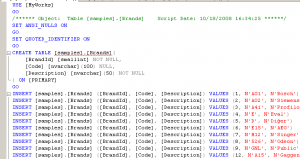
Data Script on the Query Window


Since as the output option for the scripting, the New Query Window is selected,
the final script is displayed on the SQL Server Management Studio Query Editor
window as shown below.

This script is formed of a CREATE TABLE script for the source table and
following that, INSERT statements for each row in the selected source table.

As you see, any sql developer or any database administrator can use the below
script to create a copy of any sql database tables with their data on another
sql database or an other sql server instance.


Sample Output to New Query Windows for Scripting Table Data

How to Generate the Scripts for Table with data in sql server 2005

This is the problem I faced when I want to change the schema and adding a new column to table which has lot of records. while adding a column it is showing timeout. I deleted the data from the table and added the column. But i want to insert the same data which has before delete.  Then I get a question that How i can generate scripts along with data in Sql Server 2005?. The sql server 2005 doesnot have generate script along with data facility.

Solution for SQL SERVER – 2005 – Create Script to Copy Database Schema and All The Objects – Stored Procedure, Functions, Triggers, Tables, Views, Constraints and All Other Database Objects:

  1. First of all install Database Publishing Wizard from here : Download Database Publishing Wizard. It will be installed at following location : C:\Program Files\Microsoft SQL Server\90\Tools\Publishing\

  2. Now  goto Command prompt and run following command on any desire database, it will create the script at your specified location. Script will have schema as well as data which can be used to create the same information on new server.


Examples:

Command to run which will create schema and database:
C:\Program Files\Microsoft SQL Server\90\Tools\Publishing\sqlpubwiz script -d AdventureWorks “C:\AdventureWorks.sql”

Command to run which will create schema:
C:\Program Files\Microsoft SQL Server\90\Tools\Publishing\sqlpubwiz script -d AdventureWorks “C:\AdventureWorks.sql” -schemaonly

Command to run which will create data:
C:\Program Files\Microsoft SQL Server\90\Tools\Publishing\sqlpubwiz script -d AdventureWorks “C:\AdventureWorks.sql” -dataonly

Note: I suggest that you try this on smaller database of size around 100MB.

Reference : Database Publishing Wizard

Jquery making synchronous Ajax call

Difference between Synchronous and Asynchronous
  • Synchronous is where the script stops and waits for the server to send back a reply before continuing
  • Asynchronous is where the script allows the page to continue to be processed and will handle the reply if and when it arrives.
$.ajax({
type: "POST",
url: "url of the page",
processData: false,
success: function(msg) {alert("success")},
async:false 
});
If you see the last line, the attribute declaration async:false which is the key for the telling the Jquery client proxy to make asynchronous call or not. If it is true then asynchronous otherwise synchronous. By default it is asynchronous.

Function for centering an Element

Example function for centering an element is shown below.
jQuery.fn.center = function () {
    this.css("position","absolute");
    this.css("top", (($(window).height() - this.outerHeight()) / 2) + $(window).scrollTop() + "px");
    this.css("left", (($(window).width() - this.outerWidth()) / 2) + $(window).scrollLeft() + "px");
    return this;
}


//We can call the method as follows:
$("#popup").center();

Creating our own functions in jquery

The basis of creating a our own jQuery function is actually quite simple. The following is an example to create function:

The structure required to extend the jQuery.fn object and create our own function is…
jQuery.fn.firstFunction = function () {
return this.each (function () {
alert (this.id);
});
}
You’d now be able to call your function as you normally would call any other jquery function
$('#test').firstFunction();
This would display a “nice” alert box showing the element id.

JQuery conflict when using different javascript libraries

If your application is using both JQuery and Prototype libraries(ex: External js file which are using $(.) to get the objects). Both are operating with $() to access the objects and do the client side logic. But, the $() is getting conflicted between JQuery and Prototype libraries.

The solution to resolve the conflict:

If you are using JQuery in your applications, the best practice is declare the Jquery global instance variable and then start using that variable instead of directly use the $().

For example,
var $j = jQuery.noConflict(); 
// Use jQuery via $j(...) instead of $(...)
$j(document).ready(function(){ 
$j("#someId").hide(); 
}); 

How to access html control without runat=”server” in C# code?

There is some requirement where we need to create HTML controls dynamically in c# with the string format using StringBuilder and then write the string to a page. And whenever some event raised like button click event, on server side code, we need to retrieve the values of those HTML controls. Please follow the solution below to get the values of the HTML controls which doesn't have runat="server" attribute defined.


Example:HTML declaration:
<input type="text" name="txtName" />
C# Code:
string strValue = Page.Request.Form["name of the control"].ToString();

Note:
To get the values in server side code of HTML control, we need to follow below points.
  • The form method should be of type POST.
  • The tag should have an attribute called NAME. Because it is used as key in form[].

How to get the current row in GridView command event?

I have a LinkButton element in the gridview and I need to raise the grid view command event when the user clicks the link button and in that event, I need to get the row values.

The solution for this question is as follw:

GridViewRow row = ((LinkButton)e.CommandSource).NamingContainer as GridViewRow;

Note: If your requirement is not linkbutton then please place the corresponding control name. There are lot of advantages with this property. Especially when we write and render controls to page dynamically then this property will help a lot.

Monday, 21 March 2011

HTML 5 Intellisense for Visual Studio 2010 and 2008

You all probably know that new HTML 5 standard is came in the market. A new intellisense schema that you can add to VS 2008 or VWD Express 2008 or VS2010 and get intellisense and validation on HTML 5 elements.
Note that schema is for markup only, we do not have DOM2 update for jscript intellisense yet.

Steps to install the schema:
  1. Download Visual Studio intellisense for HTML 5.
  2. Place html_5.xsd in C:\Program Files (x86)\Microsoft Visual Studio 9.0\Common7\Packages\schemas\html for 64-bit OS and Place html_5.xsd in C:\Program Files\Microsoft Visual Studio 9.0\Common7\Packages\schemas\html for 32-bit OS
  3. Run either x86 or x64 reg file depending on the OS and VS/VWD flavors installed. For example, for VWD Express installed on 64-bit OS run HTML-5-Schema-Reg-x64-VWD.reg and for VS 2008 installed on 32-bit OS run HTML-5-Schema-Reg-x86.reg.
  4. Restart Visual Studio
  5. You can select HTML 5 in the target schema dropdown and HTML 5 element attributes should appear in the Properties window.


Schema is experimental and has certain limitations.For example, VS 2008 and VWD are not able to validate 'wildcard' attribute names, like HTML 5 data-* attributes and is not able to handle 'transparent' content model when element content is defined by the element parent (see, for example, A element). However, it may help you to start playing with the new standard.

Debug Sql Server Stored Procedures in visual studio

These are the following steps required to debug stored procedure in visual studio

  1. Go to Server Explorer (Visual Studio --> View menu --> Server Explorer),

  2. Right click on Data Connections --> select Add Connection,

  3. Here type sql server name and select authentication type(windows or sqlserver), and then type your database. Click ok. Now you are connected to sql server.

  4. Select a SPROC and Right click on stored procedure --> select Step Into Stored Procedure.

  5. Select a SPROC and Right click on stored procedure --> Execute--> Give the default values to debug. Now it starts Debugging.

Using JQuery intellisence in visual studio.

Steps to Enable jQuery Intellisense in VS 2008


To enable intellisense completion for jQuery within VS you'll want to follow three steps:

Step 1: Install VS 2008 SP1

VS 2008 SP1 adds richer JavaScript intellisense support to Visual Studio, and adds code completion support for a broad range of JavaScript libraries.

Step 2: Install VS 2008 Patch KB958502 to Support "-vsdoc.js" Intellisense Files

A patch that you can apply to VS 2008 SP1 and VWD 2008 Express SP1 that causes Visual Studio to check for the presence of an optional "-vsdoc.js" file when a JavaScript library is referenced, and if present to use this to drive the JavaScript intellisense engine.

These annotated "-vsdoc.js" files can include XML comments that provide help documentation for JavaScript methods, as well as additional code intellisense hints for dynamic JavaScript signatures that cannot automatically be inferred. You can learn more about this patch here. You can download it for free here.

Step 3: Download the jQuery-vsdoc.js file

Download  jQuery-vsdoc.js file that provides help comments and support for JavaScript intellisense on chained jQuery selector methods. You can download both jQuery and the jQuery-vsdoc file from the official download page on the jQuery.com site:


Save the jquery-vsdoc.js file and your jquery.js file in the same folder of your project (and make sure its naming prefix matches the jquery file name):


You can then reference the standard jquery file with an html <script/> element like so:
<script src="jquery-1.2.6.js" type="text/javascript"></script>

<% if (false) { %> 
 <script src="jquery-1.2.6-vsdoc.js" type="text/javascript"></script>  <% } %>

Or alternatively reference it using the <asp:scriptmanager/> control, or by adding a /// <reference/> comment at the top of a standalone .js file.

For example, we could use jQuery to make a JSON based get request, and get intellisense for the method (hanging off of $.):


Note: Jquery intellisense works in Visual Studio 2010 without any Fix downloading and installing.(i.e, eliminate the step2 from the above steps) and also no need to refer the vs-doc in if else if we write internal scripts for VS2010.

To use jquery intellisense in external JavaScript file

Add the following statement at the top of the external JavaScript file
/// <reference path="jquery-1.2.6-vsdoc.js" />

Sunday, 20 March 2011

Fixing the “circular file references are not allowed” Error in ASP.net

To resolve this problem, use one of the following methods:
Method 1: Modify the web.config file
To modify the web.config file, set the batch property of the <compilation> element in the web.config file for the
application to false.
Note: This method is recommended only for small applications. In large production applications, when you set the batch property to false, ASP.NET 2.0 compiles each page in the application into a separate assembly. The individual page assemblies are then loaded at the next available memory location. Additionally, the individual page assemblies cannot be moved. This causes memory fragmentation.
Method 2: Reorder the folders in the application
To avoid a circular reference, reorder the folders in the application. To reorder these folders, follow these steps:
  1. Trace the references to the file and from the file that is indicated by the error message.
  2. Identify the circular reference.
  3. To avoid the circular reference, put the referenced files together in the same folder.